PointOptics is reader supported. We earn an affiliate commission if you buy through our links . Learn More.
The importance of sighting a rifle scope correctly cannot be emphasized enough. A rifle not correctly sighted in and zeroed to the distance you intend to hunt at is a glorified walking stick. Yet, the actual sighting in of your rifle is relatively easy and, if done correctly, can save you ammunition and time.
Mounting of your scope
Sighting in a rifle scope correctly is impossible if your scope is not mounted correctly. Before you start firing away, follow these quick five steps for the correct mounting procedure:
1. Fit the scope rings to the base on top of the rifle. Make sure the rings are fastened to the correct torque value.
2. Place the scope, turned to the highest magnification, inside the scope rings, but do not secure it just yet. Ensure the rings are spaced evenly apart and do not obstruct the bolt and magnification dial.
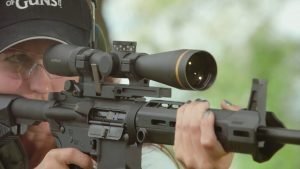
3. Shoulder the rifle, and with the optic at full magnification, look through the scope with your cheek on the butt of the rifle. Getting a full, clear picture through the scope would be best. If not, adjust the scope’s position within the scope rings until you achieve the best picture quality.
4. Place a small level on the scope With the rifle securely fastened in a vise or on a secure work surface. If your scope is fitted with a top turret, place the level on there and adjust until the level is achieved.
5. Tighten the screws on the scope rings to the recommended torque poundage.
How and Where Do You Hunt?
Where and how you hunt are important to consider before sighting your rifle.
If you plan on heading out deep into the backcountry, where shots average 400 yards plus, you need to ensure your rifle is dialed in and hit tight groupings at that distance. While if the thickly wooded area of Pennsylvania is your preferred hunting ground where a big 10-point can spring out at 80 yards in front of you, then it wouldn’t be much use in zeroing to 300 yards. In these situations, you may not have time to hold for elevation or fiddle with the turrets.
The equipment you have and its capabilities are another factor to consider, which we will touch on again later, but if you have a scope with windage and elevation turrets or a reticle with distance and wind markings, you need to be proficient in using those resources.

Bore Sight
The first initial step is to align the center of the barrel with the reticles of the scope, which can be done through bore sighting.
The main reason for boresighting the rifle is to “get on the paper” with the first initial shot and adjust from there. Bore sighting is not a final means of zeroing a rifle.
Begin by ensuring your rifle is stable and on a flat surface. This should be done by using a specifically designed gun vice. Once the rifle is secured, remove the bolt and all ammunition. Safety is always a priority.
Place a target in front of the rifle at 25-yards. Targets that are bright in color and have an obvious bullseye will make them easier to see.
Looking through the bore of the rifle, adjust its position until the bullseye is aligned with the center of the barrel. Fasten the rifle and gun vice so they do not move or get bumped.
Next, looking through the scope mounted on the rifle, use the elevation and windage turrets to move the reticle in line with the target’s bullseye. You can then double-check that the bore and reticles are aligned with the target’s middle.
Bore sight kits are available that help make this process more accurate, but they are unnecessary.
Bore sighting in at 25 yards should have you hitting the paper at 100 yards; however, it is best to take a shot at 25 yards to physically see the point of impact. The bullet should hit about an inch low of the bullseye at 25 yards.

Find Your Distance
With the bore sighting complete, you can now work on zeroing your rifle according to the distance you feel comfortable shooting at or at the distance you will most likely have to shoot at while hunting.
If you are hunting at short range from a blind over a feeding spot or well-used trail and you know the exact distance, then it is best to have your rifle zeroed into that range. This is easy enough as you can place a target at the desired distance and shoot a few rounds to get the point of impact. Then, make the necessary adjustments on the scope’s turrets until you get a good tight grouping.
For those hunters who may have to take shots at varying distances while hunting, it is best to zero the rifle at one specific range and adjust accordingly. For example, if you’re working with a long-range rifle scope, you will want to zero it into those ranges you typically use it at.
With bore sighting at 25 yards, you will be within a few inches of the bullseye at 100-yards. Fire three shots at 100-yards and adjust the turrets according to the amount needed to obtain a sufficient grouping.
Once zeroed in on 100-yards, you can decide to shoot further and have it zeroed in at 200 or 300 yards or make the necessary adjustments at 100-yards.
To zero the rifle further, fire three shots like what was done at 100-yards and make the necessary adjustments on the turrets. You should then fire an additional three to five shots to confirm zero.
Not all ranges are long enough for hunters to shoot to 200 or 300 yards, so zeroing from 100-yards may be necessary. For this, you must know the ballistic coefficients and trajectory of the bullet you are using. Most ammunition boxes have that information on the side, or you can use a ballistics calculator.
Below is an example of using a 100-yard range to sight your rifle and zero it to 200-yards.
Using a .270 Winchester rifle, firing Winchester Ballistic Silvertip BST 130-grain bullets. The trajectory table for these bullets from the manufacturer states that if the zero of the rifle were at 200 yards, then the point of impact at 100-yards would be 1.4” high. You can then adjust your scope to shoot at 1.4” above the target’s bullseye.
The information produced on the side of the box only provides the trajectory for one specific zero. Therefore, a ballistics calculator should be used to determine the point of impact at other distances should you wish to zero your rifle at 300 or 400 yards.
It should be noted that if you are using a 100-yard range for zeroing in your rifle to 200 yards, then, if possible, you should double-check the trajectory and point of impact of your rifle out to 200 yards before you go hunting.
Factors to consider
When looking at how to sight a rifle scope, it’s crucial to be as accurate as possible. With minimal variation, certain factors need to be considered and accounted for.
1. Remove human error
The rifle and scope combination needs to be 100% accurate, and for that to happen, you need to remove human error. This is why the rifle needs to be as steady as possible while firing and not moving around as you try to steady yourself for a 200-yard free-hand shot.
2. Consistent ammo use
In essence, you are sighting in your rifle and scope and the ammunition you will be hunting with. It does not help to sight in your rifle with a certain weight or brand of bullet and then completely change to different ammunition when you go hunting.
3. Allow the barrel to cool between groupings
Always allow the barrel to cool between multiple shots. This is usually 6 to 8 shots, but the best is to feel the barrel of the rifle, and if it is hot, then leave it to cool before firing again. A hot barrel will produce inconsistent points of impact.
4. MOA clicks at various distances
The Minutes of Angle (MOA) system is most used in optical rifle sights. Remember, the MOA is a unit of angle and not length. This means the length the sights move varies depending on the distance, but the MOA is constant. It would be best to consider this when adjusting with turrets at different ranges.
For example, ¼ MOA is ¼ an inch per 100 yards. At 200 yards, it is a half-inch.
5. Different ballistics for different brands and grains
Not all bullets of the same caliber are created equal. Bullets of different weights and brands will have different ballistic coefficients; hence, they will have different trajectories and points of impact. This ties in with using the same bullets for hunting you used to see in your rifle.
Rifles of the same caliber but different manufacturers may also affect bullet performance. Try various weights and brands of bullets to see which is best suited to your rifle. Once you have a preferred brand,, shoot different weights to see how they perform according to the distance you sighted your rifle.
Practice and practice some more
Sighting in the rifle is only the first step in the preparation process before you use it to go hunting. Practicing with your rifle will help eliminate bad habits such as flinching or snapping at the trigger. It will also make you a better hunter, knowing how your rifle performs, increasing confidence, and knowing exactly where your bullet will hit.
It is every hunter’s responsibility to ensure the most ethical kill of an animal is achieved. This can only be done through the correct sighting of the rifle scope and sufficient practice from the hunter.